Showing posts with label cards. Show all posts

Sunday, July 25, 2010

halloween in july

It does seem a bit early for Halloween. But I took a great class at my LSS last week using Memory Box's new Halloween stamps and papers. Neat techniques and a lot of fun! Here they are....

#1: Spooky Collage

This first card was the first and most complicated one we worked on. The owner of the store and the class teacher experimented that day to try and master the techniques for this card. They found a way to do it that came out really interesting. We started with copper/gold-like piece of cardstock that we rubbed with yellow acrylic. Then we applied Alcohol Inks in yellow, red and brown. I had never used them and LOVED them (but can't afford another new set of supplies)! Next was the fun part. We sprinkled a pile of clear embossing powder on the bottom, right corner of the inked (dry) cardstock. Then we heated it from below with a heat gun until we had a puddle of wet embossing powder. The stamp "Spooky Collage", was inked up (black ink) and ready to go and we stamped it onto the cardstock (and into the wet embossing powder). This was the result! A dimensional look. Really cool in person.

#2 Distressed Crows

This card is shades of black, orange and yellow (the photo gave it a bluish tint). This card was pretty simple - the stamp has so much visual interest on its own. We distressed the edges of a piece of Memory Box's paper with black ink and a sponge first. Then we stamped (in black ink) the "Distressed Crows". Added some black glitter to a few of the small crows with a glue pen. I have never used black glitter before and really like the effect. Obviously it has a Halloween-like appearance but I think it could be kind of elegant too. Finally we stamped & embossed the "Elemental Damask" stamp several times along the top of the card using a light orange ink and clear embossing powder. It mimics the slight damask pattern in the Memory Box paper we used. Finally we mounted the image with dimensional tape on top of a piece of black cardstock and the yellow card.

# 3 Old Fence


This was my first time using an embossing machine! We dry embossed a piece of black cardstock for the background with a spider web image. Very cool. Also used an iridescent white cream lustre on the embossed spider web - another product I had never used. The image "Old Fence" was stamped with black Stayz-On onto a shiny piece of white carstock. The edges were distressed with an edge distressor and black ink. The image was mounted onto bright green paper and mounted onto the other layers. A spider was cut with a die-cut machine (another first for me!) out of sparkly black paper and mounted with dimensional adhesive.

#4 Halloween Collage

Another simple card but I think this is my favorite of the stamps. These are nice stamps because they look like you have layered several stamps to get this appearance. But all the imagery is on one large stamp. We stamped the "Halloween Collage" stamp on a piece of inked, edge-distressed cardstock. The two spiders were colored in with a Copic marker and iridescent glitter was added with a glue pen. Finally we stamped the "Vintage Scroll" stamp across the top with light orange ink and embossed with clear powder. The imagery was mounted onto a piece of glittery cardstock with a strong adhesive.

#5 Night Cat


This last card was a little tricky but clever and a really nice effect. We started with two pieces of Memory Box patterned paper cut into the size we needed. Then on one piece we stamped the "Night Cat" image. We drew a line down from the light of the lantern down in a cone shape mimicking how the light would fall onto the cat. Using an xacto night we cut out that cone shaped portion of the paper (including the cat). We layered the second piece of patterned paper under the first (with the cut out portion and stamped image). Carefully we inked and stamped just the image of the cat into the place it needed to be (on the bottom layer of patterned paper). I'm sure my explanation is confusing but you can kind of see how it was put together if you look at the photo carefully.

So that's it! Fun cards and really nice stamps!

Happy Sunday!

Sunday, May 30, 2010

a few cards

So Proud: Prima patterned paper,Judi Kine Star stamp, alpha stamps, cardstock, brown Archiver's Ink and Faded Jeans Distress Ink

Some cards to show on this beautiful warm, sunny Sunday! I participated in another craft fair yesterday and it was a dud. I sold my cards and some other crafts and set up my dad's pen & ink drawing prints. He couldn't be there so it was just me. I sold exactly 7 cards. Between the table price and the parking meter I was still in the red. Oh well. I got some nice feedback on my cards anyhow and my dad got some nice comments on his art. And I finished sock #2 to complete my first official pair of socks! So it was succesfully in its own way! Later on I got to see my little sister's first apartment and have girl's night with my friends. The host's husband cooked us stuffed lobster tails he got while diving....mmmmm!

Here are a handful of cards I made more recently for the sale....I'll post more this week! I'm never good at keeping track of supplies but I'll do my best...

*****
Several people stopped and kept looking at this first card but it didn't sell. I just got the stamp at my LSS's yardsale. I was thinking of my dad when I got it and this might actually become his Father's Day card.

On the Road: Great Impressions stamp, Making Memories word-fetti stickers, black Archiver's Ink

*****
Very simple card. Using Distress and chalk inks and a new stamp I got. The sentiment stamp I love and have had for while...the idea was it could be for a new graduate.

Be the Change: flower stamp by Rubber Stamped, sentiment stamp by Rubber Soul, tumbled glass & shabby shutters Distress Inks, black Archiver's Ink,yellow chalk ink, misc. blue pattered paper and cardstock.

*****
This card was fun and I was kind of experimenting with tone-on-tone embossing. So I stamped the large flower all over with Versamark ink and clear embossed them and then added the large K & Co. sentiment sticker. A wedding card...

Always & Forever: large floral stamp by Inkadinkadoo, K & Co. sentiment sticker, Versamark ink, clear embossing powder.

***** 
This card is one of my favorites. I cut out the large flower from patterned paper and using a glue pen I glittered each petal.

He loves me: unknown patterned paper, K&Co sentiment sticker, diamond glitter and glue pen.

*****
This last one was very simple. Just stamped the flower and colored it in with my Prismacolor pencils and then stamped a sentiment.
Just for You: flower by saavy stamps, sentiment by Hero Arts, black Archiver's ink, Prismacolor pencils, cardstock.

I'll post a few more this week. Thanks for looking and Happy Sunday!

Sunday, February 28, 2010

playing

I wanted to share the cards I made at the class I took at my LSS yesterday. They were Tim Holtz inspired cards and we learned techniques to create the backgrounds and then added layers of stamping, acrylic and metal findings. We tried out all of the new Distress Ink colors. I loved the class and created some more backgrounds and cards as soon as I got home! I finally got myself one of the Ranger craft sheets so I could do some of the Distress Ink technqiues and two of the new ink colors to add to my collection (Rusty Hinge and Tumbled Glass). The techniques are so fun! I had used these techniques in a class I took years ago at my LSS and it was fun to refresh and to learn some new adaptations.

We started by creating the backgrounds for each of the four cards. We used a palatte of 3-4 of the new Distress colors, the Ranger craft sheet and a water spriter. Each combination of colors created a very different background. The thing I love is that you can't really control the process...you have to just go with it. I love that you can create layers of texture just in the background alone before you even add stamping and embellishments.

First here are the 4 cards created in the class:

Michaelangelo's David: this card uses the Distress Embossing powder on David and a piece of acrylic is layered over the entire card. The quote is stamped on the acrylic in Stayz-On and the acrylic is held in place by the two brads that are holding the wheels/cogs. To be honest I don't love the David stamp but I like the ideas of how this card is put together. For some reason I have never really liked stamps with people in them! Wierd I know! But I LOVE the quote! I am going to try and use that in some other works. A really important point to remember.

*****

Movie Time: I think this is my favorite though it has more going on in the card than my personal style. But I liked the techniques. We created the popcorn box and gave it 3-D with pop-dots and some of the popcorn pieces cut out for dimension. I love the Filmstrip Ribbon. We used one of the stamps in the set to create a layer under this really cool, acrylic-like ribbon. I had gotten a tin of the ribbon in one of my Cocoa Daisy kits and I'm excited to find some new ways to use it! We attached it with his Tiny Attacher. I have a little MM stapler that I will probably use on my own cards. I loved the burnt orange colors of this card and I bought two of the new Distress Ink colors...one being Rusty Hinge (the color on the popcorn box). 

*****
Wishes: This card is definately busier than my personal style but I had fun using the giant acrylic piece. This card has manyh layers. There is a sheet of music in the background that was layered on grungeboard. We inked on that with Wild Honey Distress Ink. Then stamped the quote. A large, thick piece of acrylic is layerd on top of the music sheet/quote. The card background we created earlier is stamped with the black dots on the right-hand side. Once the Acrylic was layered onto the card background we stamped on the acrylic with red Stayz-On and attached the paper heart on top of the acrylic with a pop-dot. Many layers! That was what I liked. The idea of played with clear elements and layers.

*****
Journey: Here's the final card. This one is much more subtle. The background was stamped on with a cool Eye Exam stamp (I used the Pumice Stone Distress Ink - a great color!) Funny idea for a stamp but it works! Then the car was stamped on top of that with black Archiver's Ink. The Quote was stamped and layered on patterned paper with Pop-Dots. The little clock was stamped and cut out and a clear circle acrylic piece was layered on top. The clock dial arrow was attached on top of the acrylic with Glossy Accents.

*****

Here are the cards I created when I got home. I took out all my Distress Inks and some watercolor ATC's and played around....used some various stamps, fabric flowers and other fun stuff.


I hope to play around with my stuff more later today!

Happy Sunday!

Tuesday, January 5, 2010

card by me - card by my guy


Finished another card for the Card a Day Challenge over at 2Peas....It is for my Dad's birthday coming up next week. It was fun to make! The challenge was:

1/5 - "Happy Bird Day" - Inspiration: Bird, a square card, and/or sentiment in a circle using 2 different fonts

Last time I combined a few different parts of challenges from different days. This time I used quite a bit from the challenge for today.

Here's how I did it:
  1. Cut out and layered the papers (green cardstock and pattered paper by Basic Grey - Eskimo Kisses).
  2. Stamped the branch & leaves (from Hero Arts "Sweet Owls") onto the cream cardstock rectangle with black Staze-on.  
  3. On a scrap piece of cream cardstock, I stamped the owl (from Hero Arts "Sweet Owls") twice and the cupcake and candle (from Basic Grey) once with the same ink. 
  4. Cut out just the eyes of one owl, flipped them and glued them down onto the other owl. The goal was to be able to draw in the black parts of the eyes myself so they were looking up at the cupcake.
  5. Cut out the cupcake and layered owl and attached them, one on each branch and then colored and painted them with watercolor pencils and glimmering watercolors. 
  6. Punched a circle out of white cardstock and hand wrote "Happy Birthday" in black pen.
  7. Stamped "Dad" in the center with green ink (Studio G alphas).
  8. Attached the circle sentiment using dimensional adhesive.
  9. Used a distressor on the edges of the patterned paper, inked the edges of the green and cream layers and attached the layers to the khaki Paper Source card.
It was a fun card to make! I had wanted to use those new owl stamps on a birthday card for dad so it kind of worked out that today's challenge incorporated birds.

Cary also has been asking me to photograph the card he made me for Christmas. It has become a tradition. He "kicks me out" of the room where my art desk is and he uses my supplies to make me my card. I love them. This year's really impressed me! Clever and simple in getting it's point across. I really love it!


Here's how he said he created it:
  1. Handcut and layer cream cardstock to create the illusion of the desert sand dunes.
  2. Hand draw stick figure "wise men" and used metallic pens to indicate the "gifts."
  3. Use a silver sharpie to indicate the stars.
  4. Place all layers onto a dark green card.
I LOVE IT! It's a keeper....

and so is he!

Happy Tuesday!

Sunday, December 6, 2009

let the holiday preparations begin

Holiday preparations underway! Started my Christmas cards last week. Did buy a set of 10 so I can simplify and not get stressed out making so many homemade ones. They will all be different but based on the same design. Here are two of them...only have three made and about 30 left to go!


Today I also tried out 3 new cookie recipes...

Hazelnut Roly Polys - Dec/Jan '10 Country Living


Strawberry Jam Thumbprints - Dec/Jan '10 Country Living

Coconut Macaroons - Food Network Magazine Dec 09's 50 Holiday Cookies insert

...we'll see how they taste! Cary is expected home shortly after being away for guard this weekend. He will be my taste tester. He starts back to work tomorrow. The company he was laid off from found 40 hours/week for the month of December. That is something to be grateful for.

Yesterday spent the day shopping with my sister (complete with a shared peice of Peppermint Cheesecake from the Cheescake Factory!) and I got it all done except for 3 things I need to pick up/pay for next weekend. Feels good to have found some meaningful things for people. Still need to finish knitting one gift as well.

I have kept busy this weekend but fun busy. Looking forward to a vacation coming up in a few weeks and a Girl's Night to host the weekend before Christmas. I love this time of year!

Happy Sunday!

Saturday, October 24, 2009

saturday and a card


My sister asked me if I could make her a Halloween card to send to her friend who is in England. This was the first card I've made in awhile. I used a variety of stamps, rhinestones, inked paper, and pp squares. It was fun to put together. I had good intentions to make a bunch for friends this year but I haven't been up to it.
Tonight I have an odd costume party/Girl's Night. I have to come up with a recipe that involves pasta...that includes desserts. One of my friend's sister has this Pasta Party every year and we are going this year. I am not motivated to make something. I might end up at the grocery store buying plain old pasta salad! It should be interesting!
Happy Saturday!

Friday, September 4, 2009

card and a layout

A card I made this week for my mom...


...and a layout with some of the same products...


Just got home from work and getting ready to take a walk near the ocean with Cary. It is officially my "birthday weekend celebration!" My favorite tv show was/is Gilmore Girls and Loralie believes in week-long birthday celebrations...

me too!

Happy Friday!

Sunday, May 31, 2009

sunday


A beautiful, windy and sunny day. Took some time to sit outside on my balcony and read. Waiting to see some hummingbirds at my feeder. But none yet. Also took some time to work on an Easter layout. Tried to just go with it and not think it out too much. I tend to do that sometimes and have trouble trying new things. So I just went with it. Not the best picture...but here it is...used ribbons, patterned paper, a ghost butterfly accented with pearlescent acrylic and some buttons.


Here's the baby card I made yesterday. They loved the sweater I knitted....I was so proud of it!


Having a relaxed, lazy day at home with Cary before he goes off to S. Maine overnight in prep for his early a.m. physical for the Army. One of his last preparations before he leaves for the summer in a few weeks. He even made me blueberry panckakes today...which is his specialty!
Now we are off in a few to take a walk and get some dinner before he leaves...
Happy Sunday!

Monday, January 12, 2009

magnet

untitled: another painting/collage I worked on this a.m. It's a work in progress.

Today is my Dad's birthday! We will be taking him out for dinner at the Cheescake Factory tonight. Yeah!

Today is also my last day of vacation. Sort of. Still have a another week until school starts. But it's back to my regular job tomorrow.

And...I guiltily slept in today. Much later than usual. 9:30am. I was awoken by my cell phone ringing.

Didn't recognize the number.

I am a magnet. Or more specifically...my car is a magnet.

For anyone who has been reading my blog for the past few months, in November my car was hit and -$4000, two weeks and the most aggrivating experiences with two insurace companies later- it was finally fixed.

Fast forward to today at 9:30 am.
It snowed saturday night. I carefully backed into a parking space that afternoon to wait out the snow. I didn't leave the apartment yesterday but could see my car from the window. This a.m. the Apartment Leasing Office informed me that Sunday afternoon the plow driver clipped my driver side mirror.

So I rushed to shower, dry my hair and check out the damage.

My mirror is pulvarized. Peices of black plastic all over.

I filled out an incident report in the office. The plow co. wants to pay for the damage and the leasing office is coordinating this effort. I called Honda and they ordered the part and can fix it since it doesn't involve body work. $220 plus $37 for a rental on Wednesday so I can get to work while they work on the car. Good Lord!

I am working on simplifying. Not worrying about the unimportant. At this point I just have to laugh! Of ALL the cars in this apartment complex he hits my little unassuming car. This is the 3rd time in almost 5 years it's been hit. Twice while parked and once by the guy who "didn't see" me pulling a u-turn.

And it only has 2 more payments on it. It will be a completely new car at this rate!

Anyhow...to switch gears....here are a few cards I made last night. I stumbled across Kristina Werner's blog and was inspired by some of her cardmaking videos. My cards are loosely based on some of her ideas...
This one is layers of patterned paper (the bird was on a peice of patterned paper) distressed and attached to thecard. Stamped "Hello Friend" and embossed (Hero Arts) then I tied on the ribbon. The card is a deckle-edged card.


This one I used my Memory Box tree stamp and went over it with two different tiny heart stamps in red and pink ink. Inked the edges and layered it on pink paper. Layered ribbon and bright pink striped patterned paper. Stamped "Love always" (Hero Arts) in red ink.


This one I layered some two sided patterned paper I've had in my scrap box literally for years. Also added some embossed paper that's been in my stash for years. Stamped the little coffee cup and embossed. Used my circle punch to cut it out. Stamped "Just saying hello" (Hero Arts) on purple patterned paper. Attached the greeting and coffee cup circle with pop dots. Tied a peice of ribbon on.


Also..I can't wait to see what is coming from Week #2 of Emily Falconbridge's project
52 Q.


Happy Monday.

Wednesday, January 7, 2009

my space

I'm a worrier. For reasons I won't go into here I am overwhelmed with worry sometimes. About things I don't even have answers to. Things that aren't even important.

I hate it.

In an attempt to distract and resume my relaxed vacation week at home...I took some photos of my scrap space...small as it is...to show you guys as promised.

My area is literally one wall in the bedroom of the small 1-BR apartment I share with my boyfriend. I have had my desk for years in my old apartment and LOVE it! It was the best money I've spent. It is made up of three cubes for a base with a long "board" for the top. The cube on the left was originally designed for computer componants and has open shelving. One the right are two stacked cubes with shelves and doors. One of these holds my regular boring work stuff (office supplies, bills etc).The one on top has my colored pencils, printer paper, pastels, crayons (I love a new box of Crayolas!) etc. I got the desk componants at Target about 5 years ago and they have served me well. The surface is not very deep and constricts my workspace a little but I am pretty flexible and work "with what I have" for most things. For me it has been ideal to have this contained space because I have lived in small apartments and the desk doesn't overwhelm my room.

So...here's my space:

This is a view of my space from the bed. It is what I first see when I wake up! I kind of like that.


I recently reorganized it and finally feel settled in since moving this summer. Since moving I have loved having the bulletin board on the wall. I've been clipping inspirations, photos and new stickers/rub-ons I want to remember to use. In my old apartment the desk faced into the room and was next to a window so I didn't have space for a board. I LOVE it. I was going to get a large one but thought it might look too cluttered since it is in the bedroom. If it were in a scrap room I'd like a huge bulletin board.

To the left of the Target desk are two scrap cubes. The one with the 3 drawers holds mini albums and small paper stacks. The one on top (obviously) holds my papers. One top of the cubes is a black 12x12 box that holds my paper scraps. On top I have some new sheets of paper I just got and want to use. That is the only trouble with my paper storage. I don't see everything I have and "out of sight - out of mind."


To the left of the cubes are two Ikea storage boxes (full of computer crap) that hold my printer. I wish I had something with doors so I could hide away the printer. That is the only sight I hate when I wake up. It is right next to the bed.


The following two pictures are of the left side of my desk. These compartments face in (toward my legs and feet when I'm sitting at the desk). I like that because it looks neater.


The bottom shelf holds 6 binders, each labeled, that hold stickers, alphas, journaling spots and collage images. I organize each binder with page protectors and regular sheets of copy paper so you can see the images clearly. This system has worked for me for years. I have a binder for each major catagory of "stuff" I use...my most used is the Quotations/Words binder and it is full of word & quote rub-ons and stickers. I love using these on pages and cards.

The middle shelf holds mini-books that are in progress as well as a few other odds and ends.


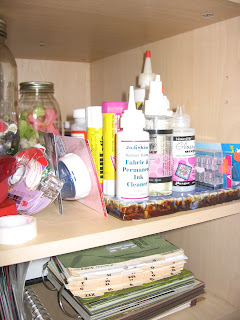
The top shelf holds a tray containing all my glues. This shelf also contains xacto knives and blades, adhesives and a few jars in back of silk flowers and buttons. I would like to have those in sight somewhere but there just isn't space.



My pens, pencils, tools and paint brushes sit on top of my desk. Each mug that holds them has a memory. One I made in ceramics, one a grad gift from a friend, one a gift from my freshmen college roommate from Japan. A small ceramic bowl I made holds mini misters. This was new to my organization since I've been using them more often. There is also a shallow ceramic dish of misc rhinestones. These are one of my favorite embellishments on cards and they just make me happy and inspired to see them.

Here is another view of the desk top. The black Nate Berkus candleholder is my FAVORITE thing about my space. I got this at Linens-n-Things years ago with the idea of keeping it on my desk. I recently reorganized it. Each little compartment holds a different sized/colored brad or rhinestone or other small embellishment. It used to hold all of my brads but I moved the ones I don't use as often (to the new little box I posted about a few days ago) to make room for new inspiration. I just love seeing all the colors right in front of me. Something about that inspires me. I actually got the idea years ago when I used to frequent a local bead shop. She had little votive holders everywhere full of beautiful colored beads. I was in awe. Also, I'm wierd...I love anything with lots of small compartments!

Here is the front of the desk. This little square of corkboard is another favorite thing. In my old apt it was the only bulletin "board" I had. I keep some computer/blog related codes on it and a few other clippings. The basket below holds most recent issues of scrap mags and inspiration books.


Hope you enjoyed seeing my space. It is small but I love it. Someday I would love to have a whole art room/studio...but that isn't in the cards for awhile. I love my little space.


Thought I would also post the three cards made in the class I took at my LSS on Tuesday. They are made with the new Hero Arts birthday stamps. They are cute. In classes I am not always thrilled with the outcome of the cards. They are usually not my usual style. I like these but mainly I like that I got lots of ideas and tried out some new techniques. Particularly playing with Taking Twinkling H2o's on the balloon card. I loved them! But think I will make do with my perfect pearls and watercolor pencils. I did invest in a water brush though. It is a great tool.

Anyway...

Here they are:


Thanks for reading! I'm going to try and relax and watch some television before getting to bed. Will be up early tomorrow and hopefully meeting my dad wherever he is working for a coffee. I love sitting and talking with him. He's one of my favorite people.

LinkWithin

Related Posts with Thumbnails